In this section you will learn how to perform your first emulation using the available scripts in the Download section. First, download the file pi_scripts.zip and extract it on your gateway server. The provided scripts are all written in Python and should act as an assistance to create you own emulations.
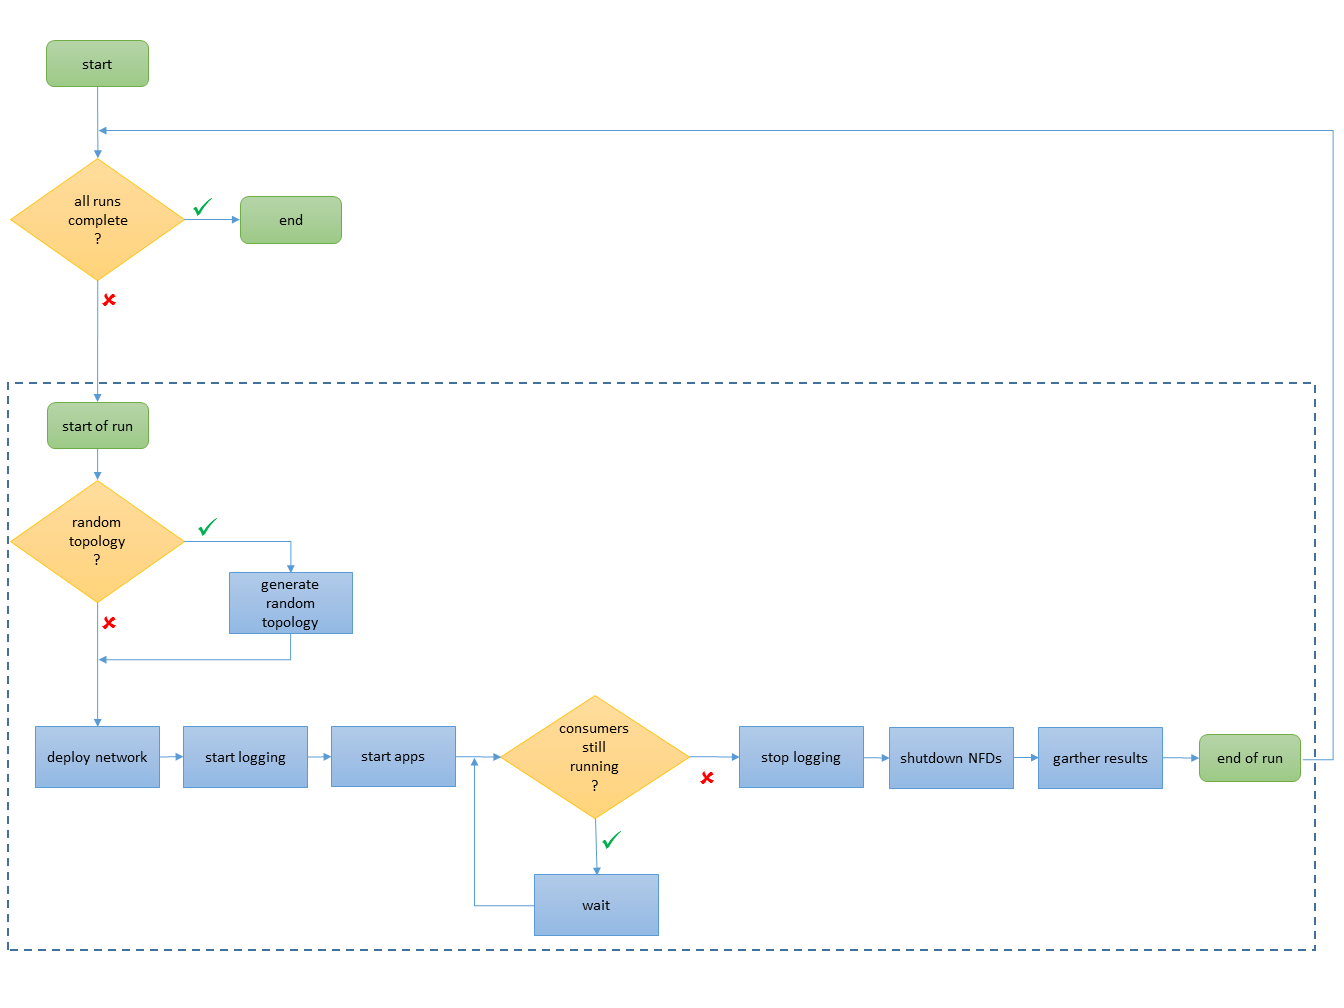
Basically, an emulation has the following work flow:
- Define the emulation parameters
- Deploy the virtual network overlay
- Enable logging on the individual PIs
- Start the NDN-based applications
- Emulation in progress, wait until all applications are finished
- Stop logging on the PIs
- Gather the results.
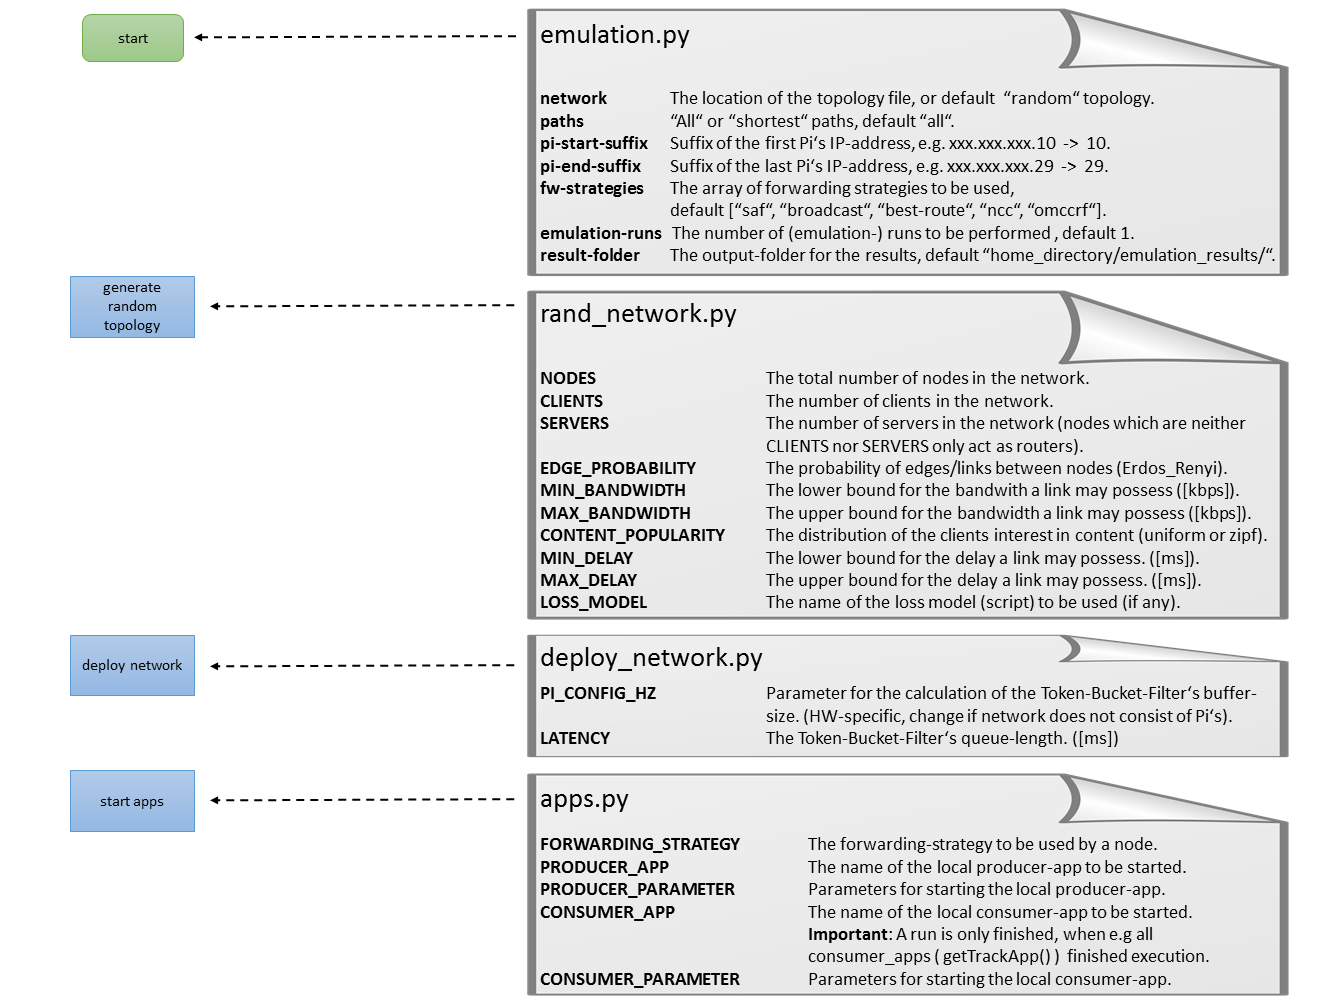
Please quickly scan the Python script emulation.py now. You will see that this script puts all previously indicated steps together, enabling you to perform emulations easily. Furthermore, it manages most of the emulation parameters. They can be simply passed by parameter when calling the script, e.g., pyhon emulation.py network=/home/yourUsername/some_network_topology.txt. For a detailed list of the parameters please have a look at the image above and the file emulation.py itself.
The next step is to define and deploy the virtual network overlay on the testbed. In general, one has two possibilities to specify the network topology. First, the definition of a fixed topology, or second, the usage of the built-in random topology generator implemented by rand_network.py. The format in which the network topology needs to be supplied is straightforward and an example is provided in the file generated_network_top.txt. Please have a short glance at this file.
If one prefers to use random topologies rather than specifying one, some customized parameters have to be specified in the file rand_network.py. One has to indicate:
- the number of nodes (ensure that this number is not greater than the available PIs and fits into the indicated prefix of IP-addresses indicated in emulation.py)
- the number of clients
- the number of servers
- the edge probability (we use the Erdos Reny approach to generate the graph) [0,1]
- range for min and max bandwidth [kbits]
- range for min and max delay [ms]
- content popularity (model defining which client consumes data from which server) [uniform/zipf]
Currently, we support only a simple consumer-producer-based emulation enabling the usage of two different applications in your emulations. The producer as the first application is installed on the server nodes and the consumer as the second application is installed on the client nodes. You may adapt the scripts if you require more than two different kinds of applications.
No matter whether you specify a fixed or a random topology, the script deploy_network.py will deploy the virtual network overlay using the management network. For details please see the Step-by-Step Guide. Furthermore, the script will start the NFDs on the PIs and registers the routes used for forwarding. You may specify whether the script shall deploy all routes or only the shortest routes to the application servers. The default setting is that all routes are used, as NDN supports inherent multipath transmission. You may change this value by passing the parameter –paths=shortest when calling emulation.py. Note that an individual route per forwarding strategy is installed, so your applications may simply decide which forwarding strategy shall be used by using a certain prefix, e.g., /broadcast/app1. The available forwarding strategies are again defined when calling emulation.py.
The next step is to start the logging. Basically you do not have to modify the logging as we simply monitor each PI device during the emulations and gather a long list of attributes every minute, including cpu load, power consumption, etc. For a detailed list we refer to the Step-by-Step Guide or you may have a glance at the script file client.sh.
Finally, the applications are started, triggering the start of the emulation. Which applications should be started by the PIs is defined in apps.py. Here you may specify custom applications and the parameters for the performed emulation run. We will discuss in another guide how to change these settings when performing multiple runs. The PI’s image is shipped with a simple producer and consumer application. We suggest that for your first emulation you should keep the file apps.py unchanged using the provided consumer and producer. If you are interested in the parameters of these applications just call “producer -h” or “consumer -h” in the console of one of your PIs.
Now the emulation should be running and the script emulation.py is waiting for it finish. An emulation is finished when all so-called track apps are finished. A track app is simply the app that is used by all consumers. Once all consumers are finished, the script emulation.py considers the emulation as finished.
Once the emulation is finished, the logging of relevant attributes is stopped on all PIs and the NFD instances are terminated. In a final step the script gather_results.py gathers all logged data and stores it on the gateway. You may have to adapt the script gather_results.py if your applications produce additional log files other than the default producer/consumer applications used for this guide.

